-
Fork workflow vs Clone workflowgit 2023. 6. 12. 23:50728x90
Fork workflow
Fork 동작은 기본적으로 내가 지정한 오픈소스의 원격 저장소의 내용을
나의 원격저장소를 새로 생성하여 이전의 내용을 가지고 오는 것으로 시작한다

이후의 Workflow를 몇 단계에 걸쳐서 설명해보자
1. 나의 로컬저장소를 만드는 과정
나의 로컬 저장소를 만드는 이유는 앞으로 원격저장소A의 내용을 수정하여 나의 원격 저장소에서 원격저장소 A로
pull Request를 할 텐데, 나의 원격저장소의 내용을 변경하는 위치가 바로 로컬저장소이다.
이 과정의 핵심은 [ 나의 저장소를 Clone으로 복제해 온다 ]이다.
2. 나의 로컬 저장소와 원격저장소 A를 연결하기
실제로 내가 변경을 일으키고 싶은 원격저장소는 A이다. 즉, 원격저장소A와 나의 로컬 저장소의 연결을 통해 최신의 소스코드를 받을 수 있어야 한다.
명령어 : git remote add upstream [ 원격저장소A 의 url ]
통상적으로 나의 원격저장소의 이름은 origin으로, 다른 원격저장소의 이름은 upstream으로 하는 경우가 일반적이다.
여기까지의 준비가 되었다면, 이제는 실제 나의 코드를 원격저장소A에 반영시키는 작업을 본격적으로 해주면 된다.
3. 나의 로컬 저장소에서 branch를 만들어 작업하기
보통 branch의 사용 이유는 특정 단위의 기능을 작업하기 위해 사용된다.
여기서ㅐ는 "원격저장소A에 내가 추가하고 싶은 기능"을 위해 branch를 만들어 작업을 하려고 한다.
명령어 : git branch [브랜치 이름]
위의 내용에 대한 자세한 설명은 , https://hongs429-blog.tistory.com/37
git - branch 생성 및 workflow
Branch 를 사용하는 이유 공동 작업을 위해서 프로잭트의 여러 기능 중 자신이 만든 기능을 확인하기 위해서 branch 만들기 명령어 : git branch [branch 이름] 이렇게 git branch를 만들면 나의 main에서 작업
hongs429-blog.tistory.com
명령어 : git checkout [브랜치 이름]
더보기TIP
브랜치를 만들고, 그 브랜치로 이동하는 명령어
git checkout -b [ 브랜치 이름 ]
나의 브랜치에 대한 작업이 완성이 되었다면,
git add .git commit -m "커밋 메세지" 하자.
위의 내용에 대한 자세한 설명은 , https://hongs429-blog.tistory.com/35
01 - git 명령어 모음(내컴퓨터 위에서 작동 시키기)
내가 작업을 할 디렉토리를 알려주어야 한다. git 저장소 생성 명령어 : git init 결과> Initialized empty Git repository in [새로운 저장소 root]/.git/ 위의 작업을 하게 되면, 앞으로 버전을 관리하는 사람의
hongs429-blog.tistory.com
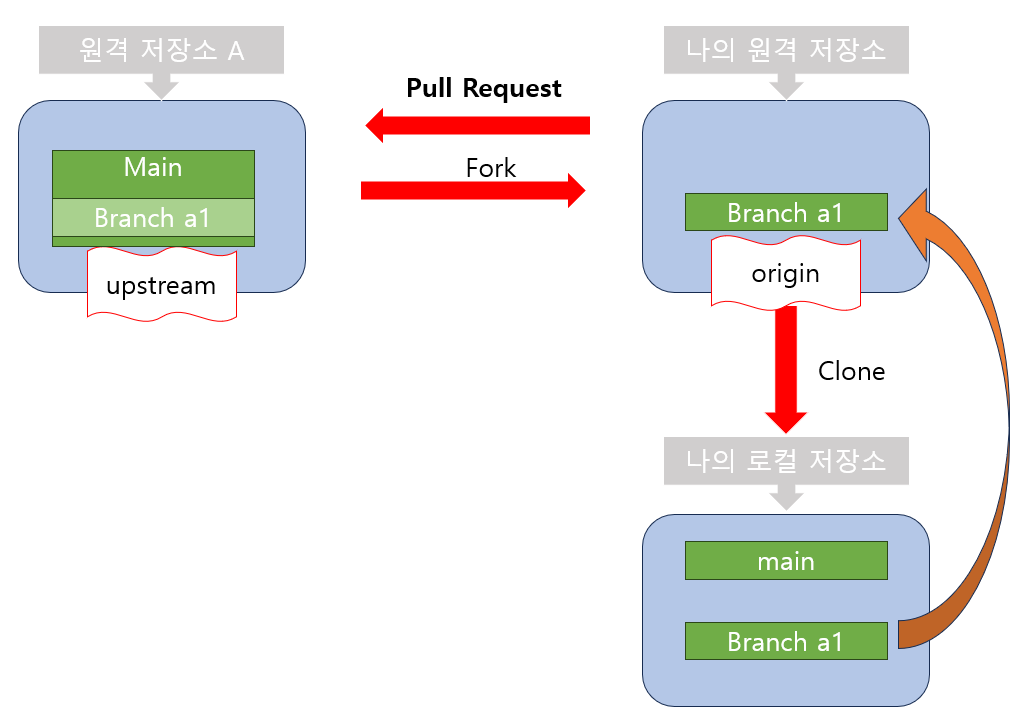
나의 원격저장소로 push를 진행하자
명령어 : git push origin [ 나의 브랜치 이름 ]
위의 과정은 나의 브랜치의 내용을 원격저장소의 동일한 이름의 브랜치에 push를 시키는 작업을 수행하는 것이다.
여기까지의 내용을 그림으로 확인하자.

3. 나의 로컬 저장소의 Branch a1의 내용을 원격저장소 A에 pull request 요청하기
여기의 내용은 Clone의 Workflow와 Fork의 Workflow에서의 큰 차이를 보인다.
- 기본적으로 fork는 코드의 내용의 수정에 대한 권한이 없다.
- Clone의 경우도 마찬가지지만 일반적으로 Clone의 경우 수정권한까지 부여받은 상태에서 Clone을 한다.
pull request의 요청이 받아들여졌다면, 나의 소스코드를 최신으로 갱신해야 한다.
4. 나의 로컬 저장소 최신화하기
main branch로 이동후,
명령어 : git pull upstream main
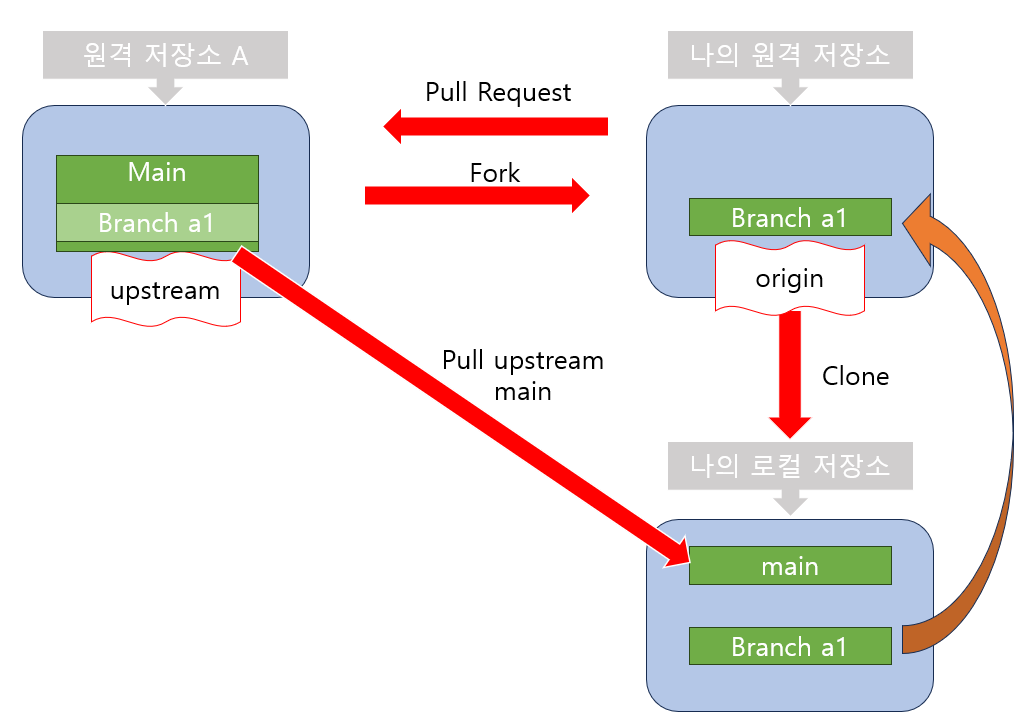
이후 나의 branch를 지우더라도, 나의 원격 저장소에 그 기록이나 남아있게되어 확인이 가능하다.
'git' 카테고리의 다른 글
git - branch 생성 및 workflow (0) 2023.06.05 01 - git 명령어 모음(내컴퓨터 위에서 작동 시키기) (0) 2023.06.03
