-
ValidationSpring/MVC2-Validation 2023. 6. 19. 23:22728x90
개념
내가 만든 웹페이지에
1. 반드시 필요한 데이터이므로 반드시 작성을 요구한다던지,
2. 입력데이터의 범위 값을 설정한다던지,
3. 데이터의 타입을 제대로 받도록 하는 작업
은 매우 필수적이다.
또 위의 과정에서 사용자가 실수로 잘못된 데이터를 입력했다면, 무엇이 어떻게 잘못되었는지 알려주어야 하는데, 그냥 오류페이지를 띄운다면 매우 좋지 않은 서비스가 될 것이다.
우리의 컨트롤러의 기능 중 하나는, 들어온 HTTP 요청이 과연 올바른 요청인지를 판단해주는 것이다.
위에서 언급한 3가지 내용은 일종의 유효성 검사이다. 웹에 대해서 어느정도 했었다면, 유효성검사를 자바스크립트, 그러니까 Client side에서 처리를 해봤을 것이다.
클라이언트 단에서 무언가 데이터를 검증하고 처리하는 것은 한계가 존재한다.
클라언트 검증 단계는 충분히 조작 가능하다 → 보안에 취약
물론 Server side 에서만 유효성 검사를 하는 것도 고객 사용성 측면에서는 부족할 순 있다.
하지만, 최종적인 데이터 검증은 서버단에서 이루어져야 안전하게 데이터 유효성 검사를 할 수 있다
(디비조회가 필요한 경우라면 더더욱!!)
과정이해
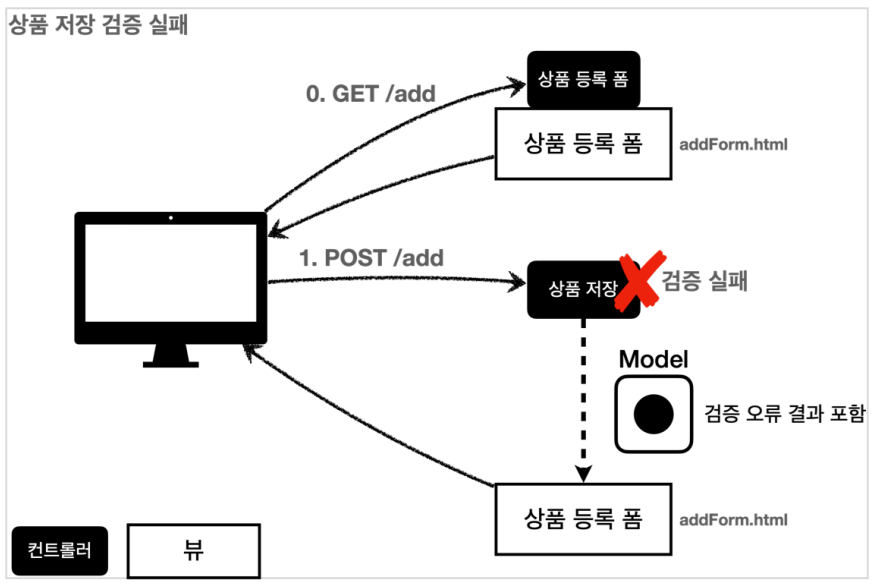
인프런 김영한 MVC2 강의 validation 내용 中 우리는 상품의 정보를 입력하고 상품을 저장하는 단계에서 원치않는 데이터의 형식 / 범위가 들어올 경우, 입력한 내용을 기억하고 사용자에게 다시 상품 등록 폼을 보여주면서 무엇이 잘못되었는지를 확인시켜줄 것이다.
적용
1단계
지금부턴 서버단에서 유효성검사가 어떻게 이루어지는지 단계적으로 알아볼 것이다.
가장 먼저 해볼 것은 if의 향연 코드이다
    @PostMapping("/add")
    public String addItem(@ModelAttribute Item item,
                          RedirectAttributes redirectAttributes,
                          Model model
    ) {

        //검증 오류 결과를 보관
        Map<String, String> errors = new HashMap<>();

        //검증 로직
        if (!StringUtils.hasText(item.getItemName())) {
            errors.put("itemName", "상품 이름은 필수입니다.");
        }
        if (item.getPrice() == null || item.getPrice() < 1000 || item.getPrice() > 1000000) {
            errors.put("price", "가격은 1,000원에서 100만원까지 허용않습니다");
        }
        if (item.getQuantity() == null || item.getQuantity() >= 9999) {
            errors.put("quantity", "수량은 최대 9,999 까지 허용합니다.");
        }

        // 특정 필드가 아닌 복합 룰 검증
        if (item.getPrice() != null || item.getQuantity() != null) {
            int resultPrice = item.getPrice() * item.getQuantity();
            if (resultPrice < 10000) {
                errors.put("globalError", "가격 * 수량의 합은 10,000원 이상이어야 합니다. 현재 값 = " + resultPrice);
            }
        }

        //검증에 실패하면 다시 입력 폼으로
        if (!errors.isEmpty()) {
            log.info("errors={}", errors);
            model.addAttribute("errors", errors);
            return "validation/v1/addForm";
        }

        // 아래는 성공 로직!
        Item savedItem = itemRepository.save(item);
        redirectAttributes.addAttribute("itemId", savedItem.getId());
        redirectAttributes.addAttribute("status", true);
        return "redirect:/validation/v1/items/{itemId}";
    }
로직의 흐름은 다음과 같다.
1. 특정 필드의 데이터 유효성에 대한 error를 체크
2. 특정 필드가 아닌, 복합적인 룰에 의한 error를 체크
3. 위 두가지 방식에 대한 error가 1개라도 있다면, error를 담고 있는 Map객체를 model에 담아 입력폼으로 가지고 감
이동한 view 템플릿에서는 thymeleaf를 이용하여 그 결과를 보여주면 된다.
○ 복합룰에 의한 에러 보여주기
<div th:if="${errors?.containsKey('globalError')}">
        <p class="field-error" th:text="${errors['globalError']}">전체 오류 메세지</p>
</div>
※ errors?. : 에러가 존재한다면, errors.containsKey ~~~ 로 진행 / errors변수가 없다면 > null 반환
○ 필드룰 보여주기
 <input type="text" id="itemName" th:field="*{itemName}"
                   th:class="${errors?.containsKey('itemName')} ? 'form-control field-error' :'form-control' "
                   class="form-control" placeholder="이름을 입력하세요">
<div class="field-error" th:if="${errors?.containsKey('itemName')}" th:text="${errors['itemName']}">
    상품명 오류
</div>
※ th:class="" 의 내용은 th:classappend=""를 이용하여 처리할 수도 있다.
문제점
위의 방식의 문제점은 다음과 같다.
1. 코드의 중복이 너무 많다.
2. 하나하나 다 잡아주어야 한다.
3. 애초에 타입오류가 발생했을 경우, 타입오류 에러를 잡아주지 못한다.
타입오류의 경우, binding 자체가 되지 않았기 때문에 잘못입력한 값을 가지고 화면에 다시 뿌려줄 수가 없다.2단계
이번단계에선 특별한 인터페이스가 등장한다.
BindingResult : 편리하게 검증 오류를 표현하는 기능을 제공
必必必必 > BindingResult는 반드시 @ModelAttribute 다음에 와야 한다! (검증할 대상)쉽게말해, 1단계에서 임의의 저장소를 만든 기능을 대체하는 것이 BindingResult라고 생각하면 된다.
BindingResult는 field 오류와 복합오류를 나누어 객체 타입으로 BindingResult에 담는다.
코드로 확인해보자.
public String addItemV1(@ModelAttribute Item item,
                          BindingResult bindingResult,  /* 무조건 ModelAttribute 객체 다음에 와야한다 */
                          RedirectAttributes redirectAttributes
    ) {

        //검증 로직
        // 필드 오류!!! Item 필드에 대한 오류 new FieldError
        if (!StringUtils.hasText(item.getItemName())) {
                                                /*Item item <- 이 이름*/
            bindingResult.addError(new FieldError("item", "itemName", "상품 이름은 필수입니다."));
        }
        if (item.getPrice() == null || item.getPrice() < 1000 || item.getPrice() > 1000000) {
            bindingResult.addError(new FieldError("item", "price", "가격은 1,000원에서 100만원까지 허용않습니다"));
        }
        if (item.getQuantity() == null || item.getQuantity() >= 9999) {
            bindingResult.addError(new FieldError("item", "quantity", "수량은 최대 9,999 까지 허용합니다."));
        }


        // 특정 필드가 아닌 복합 룰 검증
        // new ObjectError!
        if (item.getPrice() != null && item.getQuantity() != null) {
            int resultPrice = item.getPrice() * item.getQuantity();
            if (resultPrice < 10000) {
                bindingResult.addError(new ObjectError("item", "가격 * 수량의 합은 10,000원 이상이어야 합니다. 현재 값 = " + resultPrice));
            }
        }

        //검증에 실패하면 다시 입력 폼으로
        if (bindingResult.hasErrors()) {
            log.info("errors={}", bindingResult);
            /* bindResult는 view 로 알아서 가지고 간다.*/
            return "validation/v2/addForm";
        }

        // 아래는 성공 로직!
        Item savedItem = itemRepository.save(item);
        redirectAttributes.addAttribute("itemId", savedItem.getId());
        redirectAttributes.addAttribute("status", true);
        return "redirect:/validation/v2/items/{itemId}";
    }
BindingResult에 필드오류 등록방법
public FieldError(String objectName, String field, String defaultMessage) {}bindingResult.addError() 메소드를 통해 필드에러를 등록한다.
bindingResult.addError(new FieldError("item", "itemName", "상품 이름은 필수입니다."));objectName : @ModelAttribute의 name 값 . default는 커맨드 객체 타입의 앞글자 소문자이름
field : 오류가 발생한 필드 이름(커맨드객체 프로퍼티로 보통 맞춘다.)
defaultMessage : 화면에 뿌려줄 에러 메세지
BindingResult에 복합적 오류 등록방법
public ObjectError(String objectName, String defaultMessage) {}에러등록은 필드에러 등록과정과 동일하다.
bindingResult.addError(new ObjectError("item", "가격 * 수량의 합은 10,000원 이상이어야 합니다. 현재 값 = " + resultPrice));ObjectError에는 특정필드에 에러가 아니므로 field를 받은 파라미터는 없는 것을 확인할 수 있다.
1단계와 비교해서 엄청나게 달라진게 없는 것 같지만 thymeleaf 탬플릿엔진에서 그 효과가 두드러진다.
○ 복합에러에 의한 에러 보여주기
<div th:if="${#fields.hasGlobalErrors()}"><!-- ObjectError() 가 있는지 확인-->
    <p class="field-error" th:each="err : ${#fields.globalErrors()}" th:text="${err}">전체 오류 메세지</p>
</div>
#fields를 통해 bindingResult에서 보내준 데이터를 그대로 사용할 수 있다.
○ 필드에 보여주기
 <input type="text" id="itemName" th:field="*{itemName}" th:errorclass="field-error" class="form-control" placeholder="이름을 입력하세요">
<!--/*<div class="field-error" th:if="${errors?.containsKey('itemName')}" th:text="${errors['itemName']}">*/-->
<div class="field-error" th:errors="*{itemName}">
    상품명 오류
</div>
th:field=""를 통해 어떤 field를 검증할 것인지를 확인. 이후 해당 field로 에러가 있다면 th:errorclass=""에 의해 알아서 클래스에 해당 클래스를 추가한다!!!
심지어 th:errors=""를 쓰면 에러가 있다면 해당 에러를 보여주고 클래스를 추가하는 작업이 전부 사라진다.
>>>>> th:if="" ~~ 이런 복합한 로직 다 빠졋음!아직까지 해결안된 한가지가 있다.
사용자가 잘못 입력한 값은 BindingResult가 어떻게 보관하고 가지고 갈까?
또, 에러문구를 한번에 관리할 순 없을까?이부분은 FieldError 객체와 ObjectError 객체의 생성자 오버로딩을 통해 2가지 구현이 가능한 것으로 해결한다.
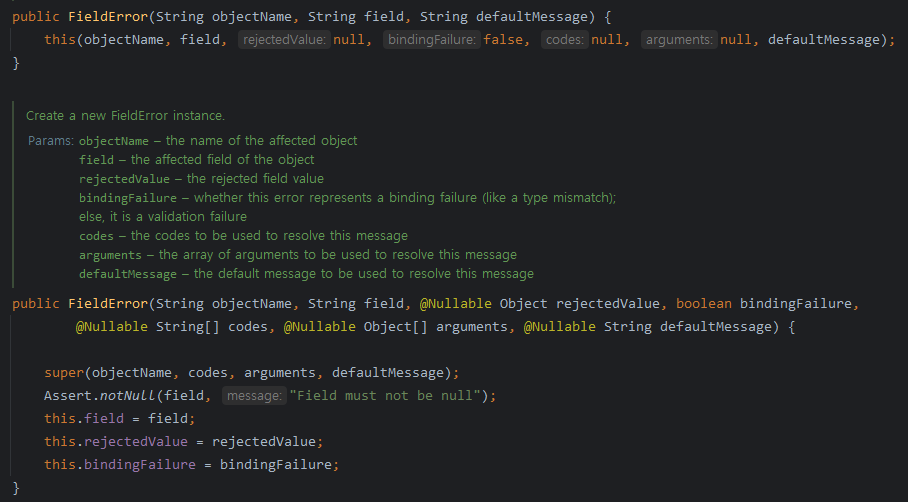
여기서 보이는 Object rejectedValue에 담기는 것이 바로 사용자가 잘못입력한 값이 담기게 되는 곳이다!!
bindingFailure : 타입은 올바르게 들어와서 바인딩이 잘되었는지를 판단하는것
codes : 에러의 단계별로 메세지를 달리하게 해주는 코드
arguments : codes의 변수를 담을 수 있는 {}공간에 들어갈 값들
 public String addItemV3(@ModelAttribute Item item,
                            BindingResult bindingResult,
                            RedirectAttributes redirectAttributes
    ) {
        log.info("object name={}", bindingResult.getObjectName()); // object name=item
        log.info("target={}", bindingResult.getTarget()); // target=Item(id=null, itemName=, price=null, quantity=null)

        //검증 로직
        // 필드 오류!!! Item 필드에 대한 오류 new FieldError
        if (!StringUtils.hasText(item.getItemName())) {
            bindingResult.addError(new FieldError("item",
                    "itemName", item.getItemName(),
                    false,
                    new String[]{"required.item.itemName"}, //code
                    null,
                    null));
        }

        if (item.getPrice() == null || item.getPrice() < 1000 || item.getPrice() > 1000000) {
            bindingResult.addError(new FieldError("item",
                    "price", item.getPrice(),
                    false,
                    new String[]{"range.item.price"},
                    new Object[]{1000, 1000000},
                    null));
        }

        if (item.getQuantity() == null || item.getQuantity() >= 9999) {
            bindingResult.addError(new FieldError("item",
                    "quantity",
                    item.getQuantity(),
                    false,
                    new String[]{"max.item.quantity"},
                    new Object[]{9999},
                    null));
        }

        // 특정 필드가 아닌 복합 룰 검증
        // new ObjectError!
        if (item.getPrice() != null && item.getQuantity() != null) {
            int resultPrice = item.getPrice() * item.getQuantity();
            if (resultPrice < 10000) {
                bindingResult.addError(new ObjectError("item",
                        new String[]{"totalPriceMin"},
                        new Object[]{10000, resultPrice},
                        null));
            }
        }

        //검증에 실패하면 다시 입력 폼으로
        if (bindingResult.hasErrors()) {
            log.info("errors={}", bindingResult);
            /* bindResult는 view 로 알아서 가지고 간다.*/
            return "validation/v2/addForm";
        }

        // 아래는 성공 로직!
        Item savedItem = itemRepository.save(item);
        redirectAttributes.addAttribute("itemId", savedItem.getId());
        redirectAttributes.addAttribute("status", true);
        return "redirect:/validation/v2/items/{itemId}";
    }
이제 우리는 에러문구를 관리하는 별도의 파일을 관리할 수 있다.
errors 메시지 파일 생성
스프링부트는 messages.properties를 기본으로 인식하지만, 설정을 통해 messages.properties 와 error 메세지를 관리하는 파일인 errors.properties를 모두 인식하게 할 수 있다.
◎ 설정하기
- application.properties에 설정 추가
spring.messages.basename=messages,errors
- errors.properties 파일 추가 및 설정 추가
required.item.itemName=상품 이름은 필수입니다.
range.item.price=가격은 {0} ~ {1} 까지 허용합니다.
max.item.quantity=수량은 최대 {0} 까지 허용합니다.
totalPriceMin=가격 * 수량의 합은 {0}원 이상이어야 합니다. 현재 값 = {1}여기까지 되었다면, 위에 코드에서 codes 인자에 맞는 에러문구가 등록이 되고, {0}, {1}, .. 에는 new Object[]{...}에 등록한 인자들이 치환되어 출력이된다.
3단계
BindingResult는 기능을 적용할 target(binding된 커맨드 객체)과 이에 대한 ObjectName을 알고 있다.
이게 가능한 이유는, BindingResult의 위치가 커맨드객체 다음에 필히 왔어야 했기 때문이다.

public String addItemV4(@ModelAttribute Item item,
                            BindingResult bindingResult,
                            RedirectAttributes redirectAttributes
    ) {
        log.info("object name={}", bindingResult.getObjectName()); // object name=item
        log.info("target={}", bindingResult.getTarget()); // target=Item(id=null, itemName=, price=null, quantity=null)


        //검증 로직
        if (!StringUtils.hasText(item.getItemName())) {
            bindingResult.rejectValue("itemName", "required");
        }
          /* ↕↕↕↕↕↕↕↕↕ 위 아래는 같은 것이다. */
//        ValidationUtils.rejectIfEmptyOrWhitespace(bindingResult, "itemName", "require");


        /*
            if 조건을 조절해서
                typeMismatch 메세지와 range와 따로 따로 보여줄 수 있따.
        */
        if (item.getPrice() != null && (item.getPrice() < 1000 || item.getPrice() > 1000000)) {
            bindingResult.rejectValue("price", "range", new Object[]{1000, 1000000}, null);
        }

        if (item.getQuantity() == null || item.getQuantity() >= 9999) {
            bindingResult.rejectValue("quantity", "max", new Object[]{9999}, null);
        }

        // 특정 필드가 아닌 복합 룰 검증
        // new ObjectError!
        if (item.getPrice() != null && item.getQuantity() != null) {
            int resultPrice = item.getPrice() * item.getQuantity();
            if (resultPrice < 10000) {
                bindingResult.reject("totalPriceMin", new Object[]{10000, resultPrice}, null);
            }
        }

        //검증에 실패하면 다시 입력 폼으로
        if (bindingResult.hasErrors()) {
            log.info("errors={}", bindingResult);
            /* bindResult는 view 로 알아서 가지고 간다.*/
            return "validation/v2/addForm";
        }

        // 아래는 성공 로직!
        Item savedItem = itemRepository.save(item);
        redirectAttributes.addAttribute("itemId", savedItem.getId());
        redirectAttributes.addAttribute("status", true);
        return "redirect:/validation/v2/items/{itemId}";
    }
rejectValue() --> FieldError()의 기능 대체
reject() --> ObjectError()의 기능 대체
여기에선 ObjectName을 적지 않는다. 왜냐하면, 그 대상이 무엇인지 이미 BindingResult는 알고 있기 때문이다.
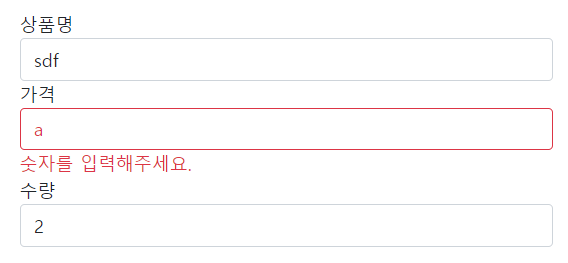
현재 price 필드 상황
코드
>> bindingResult.rejectValue("price", "range", new Object[]{1000, 1000000}, null);
errors.properties
>> range.item.price=가격은 {0} ~ {1} 까지 허용합니다.
출력 결과
>> 가격은 1000 ~ 1000000 까지 허용합니다.errors.properties에는 range만으로 입력된 error code는 보이지 않는다. 그런데도 출력은 잘 되었다.
이를 알기 위해서는 MessageCodesResolver를 이해하는 과정이 필요하다.
MessageCodesResolver
내부적으로 MessageCodesResolver는 다음의 규칙을 기반으로 error code를 읽어드린다.
1단계 - ErrorCode.TargetName.Field
2단계 - ErrorCode.Field
3단계 - ErrorCode.Field의 Type
4단계 - ErrorCode
위와같은 규칙에 의해서 Range만의 ErrorCode를 입력했음에도 4단계의 에러코드를 등록하여, 순차적으로 찾게된다.
때문에 price의 경우, 1단계가 적용되어 그 결과가 나오게 된 것이다.
MessageCodesResolver의 기능으로 한가지 더 보자면,
타입오류에 대한 메세지코드를 이미 자동으로 만들어 놓았다는 것이다.

만약 우리가 타입오류에 대한 내용을 커스텀하게 만들고 싶다면? >> errors.properties에 직접 error 메세지 등록
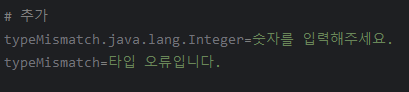
이렇게하면 숫자타입으로 받아야하는 아이들을 컨트롤할 수 있고, 또 숫자타입을 제외한 다른 모든 타입은 '타입오류입니다' 라는 메세지를 띄우게 설정한 것이다.
4단계 - 파일분리
validator 분리 - 1
우리는 하나의 클래스는 하나의 기능을 담당해야한다는 단일 책임원칙을 적용하기 위해, validation에 해당하는 코드를 따로 분리하는 것을 권장한다.
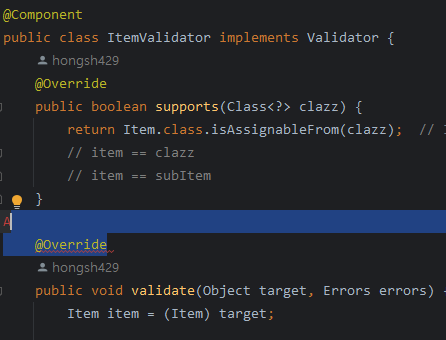
아이템의 검증오류처리를 위한 클래스인 ItemValidator를 만들고나면, Validator를 implements하여야 한다.
그리고 2가지 메서드를 overriding하게 되는데,
- support(Class<> clazz) : 해당 클래스타입이 우리가 검증하려는 Item 클래스의 타입인지 혹은 이를 상속받은 타입인지를 체크해주는 메소드
- validate(Object target, Errors errors) : 실제 validation 수행 로직을 담고 있는 메소드
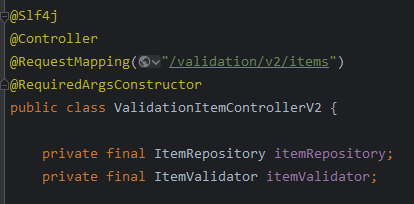
ItemValidator를 컴포넌트스캔으로 빈으로 등록한뒤 이를 AutoWired한다. <DI>
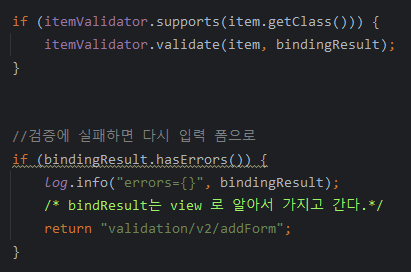
보는 것처럼 들어온 item의 객체가 Item.class.isAssignableFrom 인지 체크후, 체크 되었다면 validate로직 수행.
하지만 직접 주입을 받아 사용할 경우, support 메세지는 굳이 필요가 없다.
validate 로직은 이전까지 우리가 컨트롤러에 작성했던 validation 로직을 전부 옮겨주었다.
Component
public class ItemValidator implements Validator {
    @Override
    public boolean supports(Class<?> clazz) {
        return Item.class.isAssignableFrom(clazz);  // Item클래스타입을 상속받앗던가 그자신인지 확인
        // item == clazz
        // item == subItem
    }

    @Override
    public void validate(Object target, Errors errors) {    /* Errors는 BindingResult의 부모클래스*/
        Item item = (Item) target;

        //검증 로직
        if (!StringUtils.hasText(item.getItemName())) {
            errors.rejectValue("itemName", "required");
        }
        if (item.getPrice() != null && (item.getPrice() < 1000 || item.getPrice() > 1000000)) {
            errors.rejectValue("price", "range", new Object[]{1000, 1000000}, null);
        }
        if (item.getQuantity() == null || item.getQuantity() >= 9999) {
            errors.rejectValue("quantity", "max", new Object[]{9999}, null);
        }

        // 특정 필드가 아닌 복합 룰 검증
        // new ObjectError!
        if (item.getPrice() != null && item.getQuantity() != null) {
            int resultPrice = item.getPrice() * item.getQuantity();
            if (resultPrice < 10000) {
                errors.reject("totalPriceMin", new Object[]{10000, resultPrice}, null);
            }
        }
4단계
Validator 분리 - 2
앞선 방법은 검증기를 주입받아 사용했다면, 이번에는 Validator 인터페이즈를 이용하여 스프링의 추가적인 도움을 받을 수 있는 검증기를 만들어보겠다.
그중 첫번째는, @InitBinder
// 웹에서 전달받은 데이터를 binding하게 해주는 객체
// 하위 어떤 handler mapping이 되더라도, 이 로직은 항상 먼저 처리된다.
@InitBinder
public void init(WebDataBinder dataBinder) {
    dataBinder.addValidators(itemValidator);

}
@initBinder 에노테이션은 해당 컨트롤러에만 영향을 준다! (글로벌설정은 다음에..)
@PostMapping("/add")
public String addItemV6(@Validated @ModelAttribute Item item,
                        BindingResult bindingResult,
                        RedirectAttributes redirectAttributes
) {

    //검증에 실패하면 다시 입력 폼으로
    if (bindingResult.hasErrors()) {
        log.info("errors={}", bindingResult);
        /* bindResult는 view 로 알아서 가지고 간다.*/
        return "validation/v2/addForm";
    }

    // 아래는 성공 로직!
    Item savedItem = itemRepository.save(item);
    redirectAttributes.addAttribute("itemId", savedItem.getId());
    redirectAttributes.addAttribute("status", true);
    return "redirect:/validation/v2/items/{itemId}";
}
@Validated : 내가 검증을 할 Command 객체를 지정하면, WebDataBinder에 등록된 ItemValidator 클래스가 동작을 한다. 이때, 여기에 검증절차를 적용한다. 이 때 가장먼저 support 메소드가 호출되면서 타입을 확인하고 validate 메소드가 실행된다.
여기까지 Validation의 기본적인 동작원리를 알아보았다. 다음은 Bean Validation을 알아보자.
Bean Validation이야 말로 개발자 친화적으로 설계된 아주 좋은 검증이다.
'Spring > MVC2-Validation' 카테고리의 다른 글
Bean Validation (0) 2023.06.20